Has Docs caught up to Word as an enterprise productivity application? We compare the two word processors to see which wins in today’s online environment.
 By Preston Gralla Contributing Editor, Computerworld | Dec 6, 2016 3:00 AM PT

Have you been thinking of reassessing which word processor your business should standardize on? The obvious choices are the two best known: Microsoft Word and Google Docs. But which is better?
Several years ago, the answer to that would have been easy: Microsoft Word for its better editing, formatting and markup tools; Google Docs for its better collaboration. But both applications have been radically updated since then. With Office 2016, introduced in September 2015, Word was given live collaboration tools. And Google has been adding more sophisticated formatting, editing, and markup features to Docs.
To find out which word processor is now better for which tasks, I’ve done the tech version of a taste test. I compared Google Docs and Microsoft Word by using them to perform basic, everyday tasks, including starting a new document from a template, changing fonts, copying and pasting, using templates, inserting charts, doing online research, and more.
I began by creating a typical business report. I then did some text formatting, chose new styles, copied and pasted text, and performed similar tasks.
After that, I created and inserted a chart, did online research and inserted a photo from the internet. I then collaborated on the document in two ways: live and online (so I and a co-worker could see what each other was doing), and individually using markup and editing tools.
Given that it’s a multiplatform world, I worked on the same document on multiple platforms: a Windows PC, a Mac, a Android tablet, an iPad and an iPhone. I used both the local client and the online version of Word (Google Docs, of course, is only web-based). Then I saved the report in a variety of file formats.
To keep things simple, the descriptions that follow are all based on the version of Word 2016 that is part of Microsoft Office 365, used on a Windows PC. Some of the features may appear differently on a Mac.
And before I forget — there is one glaring difference between the two that should be mentioned: price. Google Docs is, of course, free. Microsoft Word is available as part of Microsoft Office, which has a variety of different iterations for personal or business use, and is also available as either an annual subscription or a one-time purchase.
For example, Office 365 Home costs $100 per year and can be used on up to five PCs or Macs, five tablets, and five phones; it includes Word, Excel, PowerPoint, OneNote, Outlook, Publisher and Access, along with 1TB of OneDrive cloud storage. If you don’t like subscriptions, Office Professional 2016 offers the same applications for a single PC at a cost of $400. There are other packages available as well.
And, of course, there are a number of plans for business that have per-seat annual licensing fees.
Creating a report
How you present something visually can have as much of an impact as the content of the report itself. So I started by looking for a visually compelling template to base the report on. Then I tested text-handling and other common features you’d use to write a report.
Microsoft Word
Word shines when it comes to its choice of templates. I chose File > New, and was immediately shown 25 templates for reports, calendars, flyers, and more.
However, only three of those were for reports, which isn’t a particularly impressive number. So I turned to Microsoft’s online template repository by typing “report” at the top of the template page. And hit the jackpot: 96 different templates in a wide variety of designs and styles for many different types of reports. I could choose from annual reports, employee status reports, client satisfaction survey reports, and more.

Word shines when it comes to its choice of templates.
When I clicked any template, I got more details about it, including its purpose and what it’s ideally suited for. All I had to do was download, save, and name it, and I had a well-designed template for the report, ready to go.
As mentioned before, I wanted something visually compelling, so I chose one that already had graphics in it. I figured I could always delete the default graphics and replace them with ones I could find online. Besides a nice design and graphics placeholders, the template I selected included other extras as well, including a pre-built table of contents that included links to each of the report’s sections (labeled Head 1, Head 2, and so on). When I renamed each of those sections, that text flowed back into the table of contents automatically.
I decided to change fonts and text attributes as well. It was easy: I just chose them from the Ribbon’s Home tab. It was just as simple to customize paragraph styles, including alignment, spacing, and so on. The same held true for bulleted and numbered lists.
Word’s themes (found on the Design tab) are also straightforward to use. Themes let you apply pre-created collections of text and paragraph attributes to an entire document, including titles, body text, and headings. Hover your mouse over any theme, and the document you’re working on will show a preview of what it would look like if the theme were applied to it. Click the theme to apply it to the document.
When it comes to copying and pasting text, Word’s smart paste feature may be its biggest unsung productivity enhancer. When you paste text from another source, you can choose to keep the text formatting from the source, use the formatting in your current document, or combine the two using the “Merge formatting” choice. When you merge formatting, it uses most of your current document’s format, but retains important formatting from the source, such as an embedded web link.
Word has another extremely useful feature for formatting text: Highlight text you want to format and a mini-menu appears that lets you change attributes such as font, size, weight and color; you can also turn the selection into a bulleted or numbered list, or apply styles to it.
Google Docs
It’s simple to create a new document from a template in Google Docs, but I didn’t find the same wealth of templates that I did in Microsoft Word.
After logging in, you start a new document by clicking on a blank template or one of the pre-created templates at the top of the screen. There are initially a handful of templates to choose from; when I clicked More, I found about three dozen in several categories, including Resumes, Letters, Education, and Work.

It’s simple to create a new document from a template in Google Docs, but there isn’t the same wealth of templates that’s in Microsoft Word.
The choice was underwhelming. While Microsoft Word had 96 templates for creating reports, Google Docs had only four — and all were in the Education template section. The designs themselves tend to be bare-boned, without sophisticated layouts or interactive tables of contents, such as the ones Word has. Google Docs simply can’t compete with Word when it comes to pre-built templates.
On the other hand, it’s easy to use the menu across the top of the screen to perform tasks such as text handling, creating bullets, and changing fonts and font sizes. It’s also quite simple to use the Insert menu to add a variety of objects, including images, links, equations, lines, special characters, headers, footers, and more.
But don’t expect anything more sophisticated than that. Google Docs doesn’t have Word’s built-in themes, there’s no mini-menu for handling text and formatting, and there’s no smart paste feature, either.
Bottom line
Microsoft Word has a much better selection of templates than Google Docs and its templates are far more sophisticated. Word also has better tools for formatting text and changing document styles. If you care about how a document looks, Word is clearly the way to go. Google Docs generally creates plain-looking documents and lacks any but the most basic tools for dressing up or inserting text.
Inserting a chart
What’s a report without a chart? Pretty boring and often not very informative. So I tested how easy or hard it is to create and insert a chart into a business report.
Microsoft Word
Word makes it exceedingly simple to create a chart. From the Ribbon, I chose Insert > Chart, and selected the type of chart I wanted to create. I was able to pick just about any chart type — in addition to the usual (such as column, line, pie, bar, area, and histogram), I found a host of others that were a bit more esoteric, like waterfall, funnel, and box and whisker.
Depending on the type of chart, you may get more than one possibility. For example, you can choose from five different types of pie charts, four types of stock charts, and six types of line charts. I’m a big fan of 3D pie charts, so that’s what I used for the report.

When you create a Word chart, a mini-spreadsheet lets you input data.
When I inserted the chart, a kind of mini-spreadsheet appeared into which I could input the data. When I was done, I clicked the chart itself to make the spreadsheet go away so that it was not visible in the document. To edit the data again, I just had to click the chart and, from the menu that appeared, select Edit data > Edit data.
It takes very little work to change the layout and style of charts, or to make other edits — for example, deciding which elements to include or exclude. You click in the chart and a small set of four icons appear to the right of the chart. One lets you change the way the chart is laid out in the text, so you can customize how text wraps around it. A second lets you select which chart elements to include — the chart title, data labels, and legend. The third lets you change the colors and the chart style — for example, whether a pie chart should be 3D, have cutaway pieces, and so on. And the fourth handles which chart values to show.
You can right-click the chart for even more options, such as adding new data labels or changing the chart type.
Google Docs
As with Word, it’s a breeze to insert a chart in Google Docs: Select Insert > Chart and choose a chart type (bar, column, line, or pie); a basic chart of that type — with sample data — will then be inserted into the document. You then input your own data by clicking an “Open in Sheets” icon, which opens a new browser tab with the sample data and chart in a Google Sheets (Google’s spreadsheet app). Go back to your original document, where you’ll find a new Update button. Click that, and any changes you made in the Sheets document will be reflected in the Docs chart.

It’s very easy to insert a chart in Google Docs.
I found that having to switch between browser tabs and click an update button was a kludgier method than Word’s, where everything is done right within the document itself. Also problematic is that, in order to edit the chart title, legend, and so on, you have to go to the spreadsheet tab — you can’t do it from within the chart itself.
When you first create a chart in Google Docs, you get a choice of only a few bar, column, line, and pie charts. But if you edit the chart in the separate spreadsheet tab, you get a larger selection, including a scatter chart, histogram, area chart, combo chart and stepped area chart. Again, though, if you want to see how that new chart type looks in the report itself, you’ll have to go back to the report tab and click update. For me, this is all unnecessarily confusing.
As for differing styles of chart types — for example, if you want to create a 3D pie chart — you can’t do it. You get only a single design and layout for each chart type: Bland, vanilla, and — there’s no other way to say this– just plain boring.
That being said, there are some good things about the way Docs handles charts. Wrapping text around a chart is straightforward: Click the chart and choose “Wrap text” from the menu that appears at the bottom of the chart. And if you’ve already created a chart in Google Sheets, it’s easy to insert it into your document. Select Insert > Chart > From Sheets and you’ll be able to browse to the Google Sheet where you want to insert a chart and then insert it.
Bottom line
Microsoft Word is a clear winner here. You get a far larger selection of chart styles, it’s easier to make them look good, and it’s far less awkward to input data than in Google Docs.
Online photos and research
I decided to spruce up my report with photos from online sources — without leaving Word or Google Docs. I also tested out how easy or hard it is to do online research from within each application.
Microsoft Word
Word does a very good job of letting you do research and find online images without having to go to your browser — the tools for doing it are built right into Word.
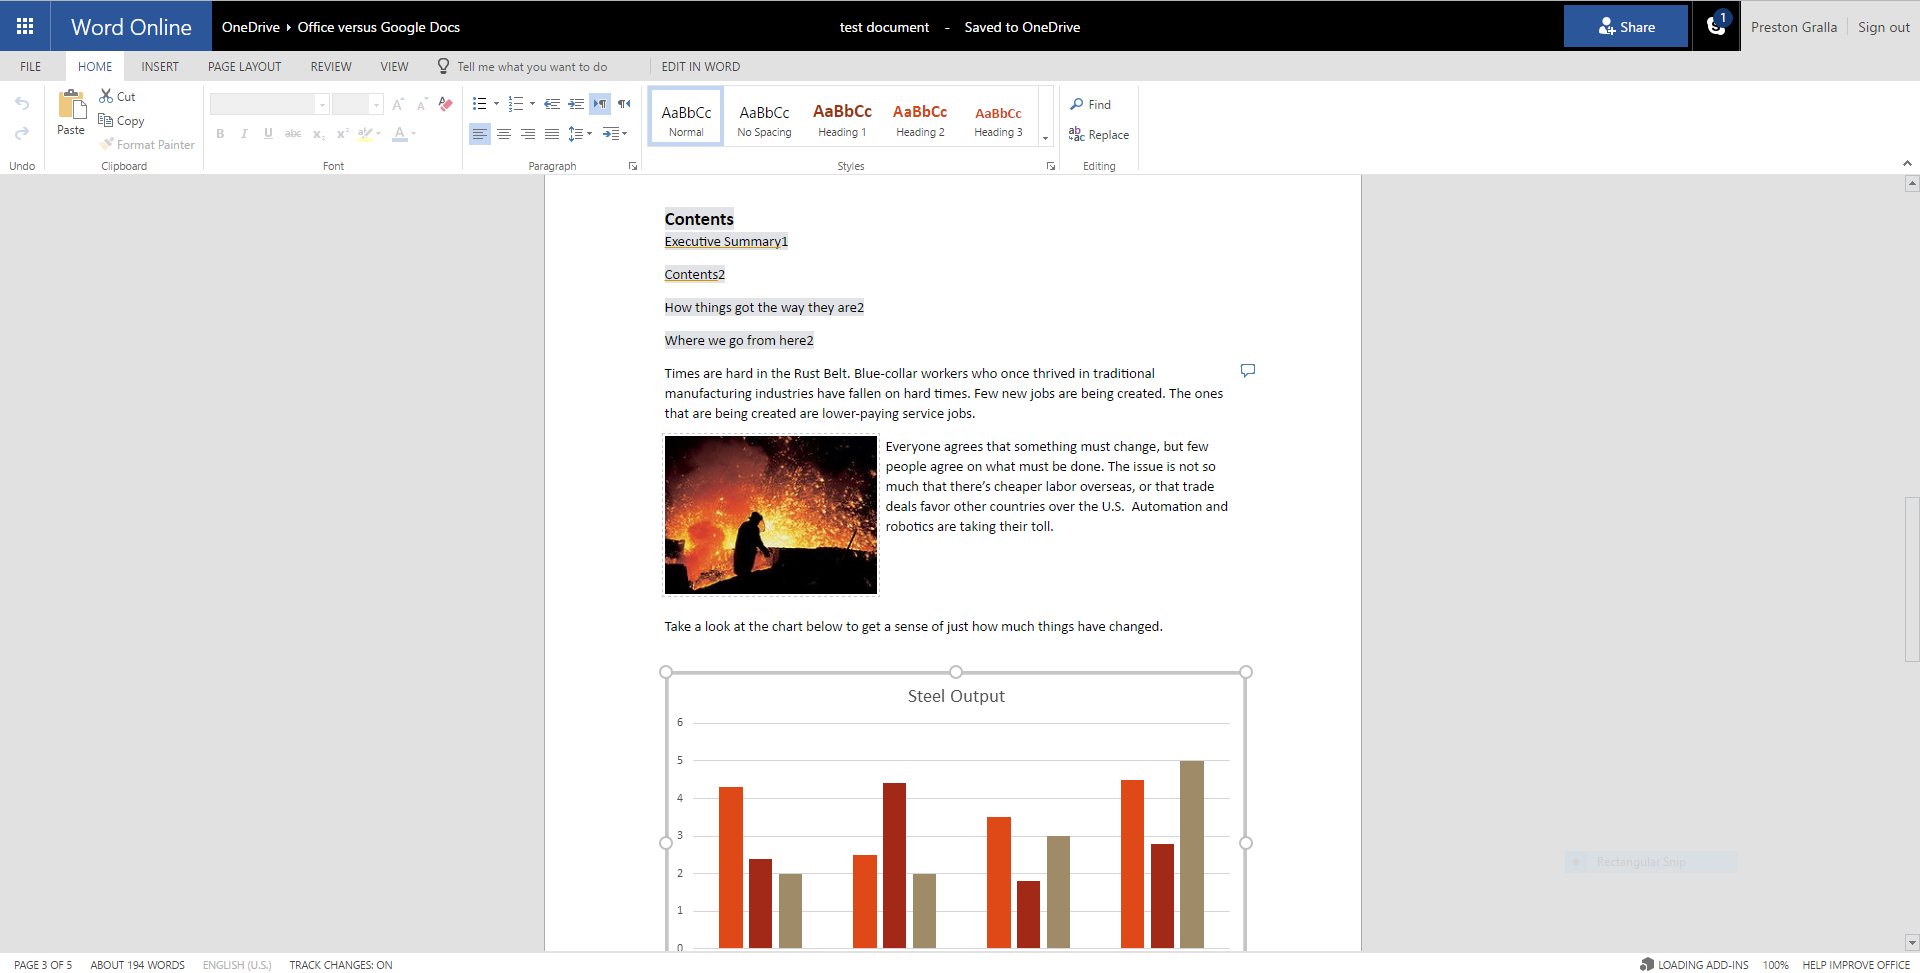
I wanted to find a photo of a steel plant for the report. I went to the Insert tab on the ribbon and clicked Online Pictures. (Note: There is no equivalent for this in the Mac version.) In response, a pop-up box appeared that let me do a Bing image search (you can expand the search to Facebook and Flickr). I saw dozens of images, all of which were covered by a Creative Commons license that allows them to be used legally and without paying royalties. (I didn’t see any way to review the individual license for each photo. I could have expanded the search to find all results, even those not covered by Creative Commons, but I prefer to stay on the right side of the law.)

To insert the picture, I just had to click on it. This brought up a tab in the Ribbon that gave access to Word’s very nice photo-editing tools, including sharpening, softening, changing contrast, color-editing, adding effects, determining how text wraps around the image, and more.
Word offers several useful tools for online research, including the ability to search Wikipedia directly from Word using an add-in installed from the Office Store. Just click Wikipedia on the Insert tab and install the add-in. Then all you do is click on Insert > Wikipedia and type your search term into the box that appears in the right pane.
Another tool is even more useful: Smart Lookup. Highlight the text in your document you’d like to research, then right-click and from the menu that appears select Smart Lookup. A right pane appears with search results from Wikipedia, Bing image search and the web.
What’s missing is the ability to do a search on any topic or words, not just those in your document. For example, if you want to search for the annual steel output of the U.S. in 2015, and you don’t have those precise words in your document, you’ll still have to head to your web browser to do the search.
Google Docs
No great surprise: The biggest search engine on the planet lets you search for images and research from right within Google Docs, and does a very good job of it.
Click the small icon of a four-sided star at the bottom right of the screen, and a panel titled Explore appears on the right side of the screen; it has a search box on top, along with suggestions for information and images you might want to include in your document, based on the document’s content. These suggestions are divided into three sections: Topics, Images, and Related Research.
I tested the feature using a made-up report titled ‘Pain in the Rust Belt.” I first looked at the Topics section, which came up with a mixed bag of suggestions. I mentioned the Rust Belt several times in the report as well as steel plants and the auto industry, and the topics it chose were Sun Belt, General Motors and a documentary titled “Red White and Blueprints: A Rust Belt Documentary.” Click any of the listed topics, and it does a web search.
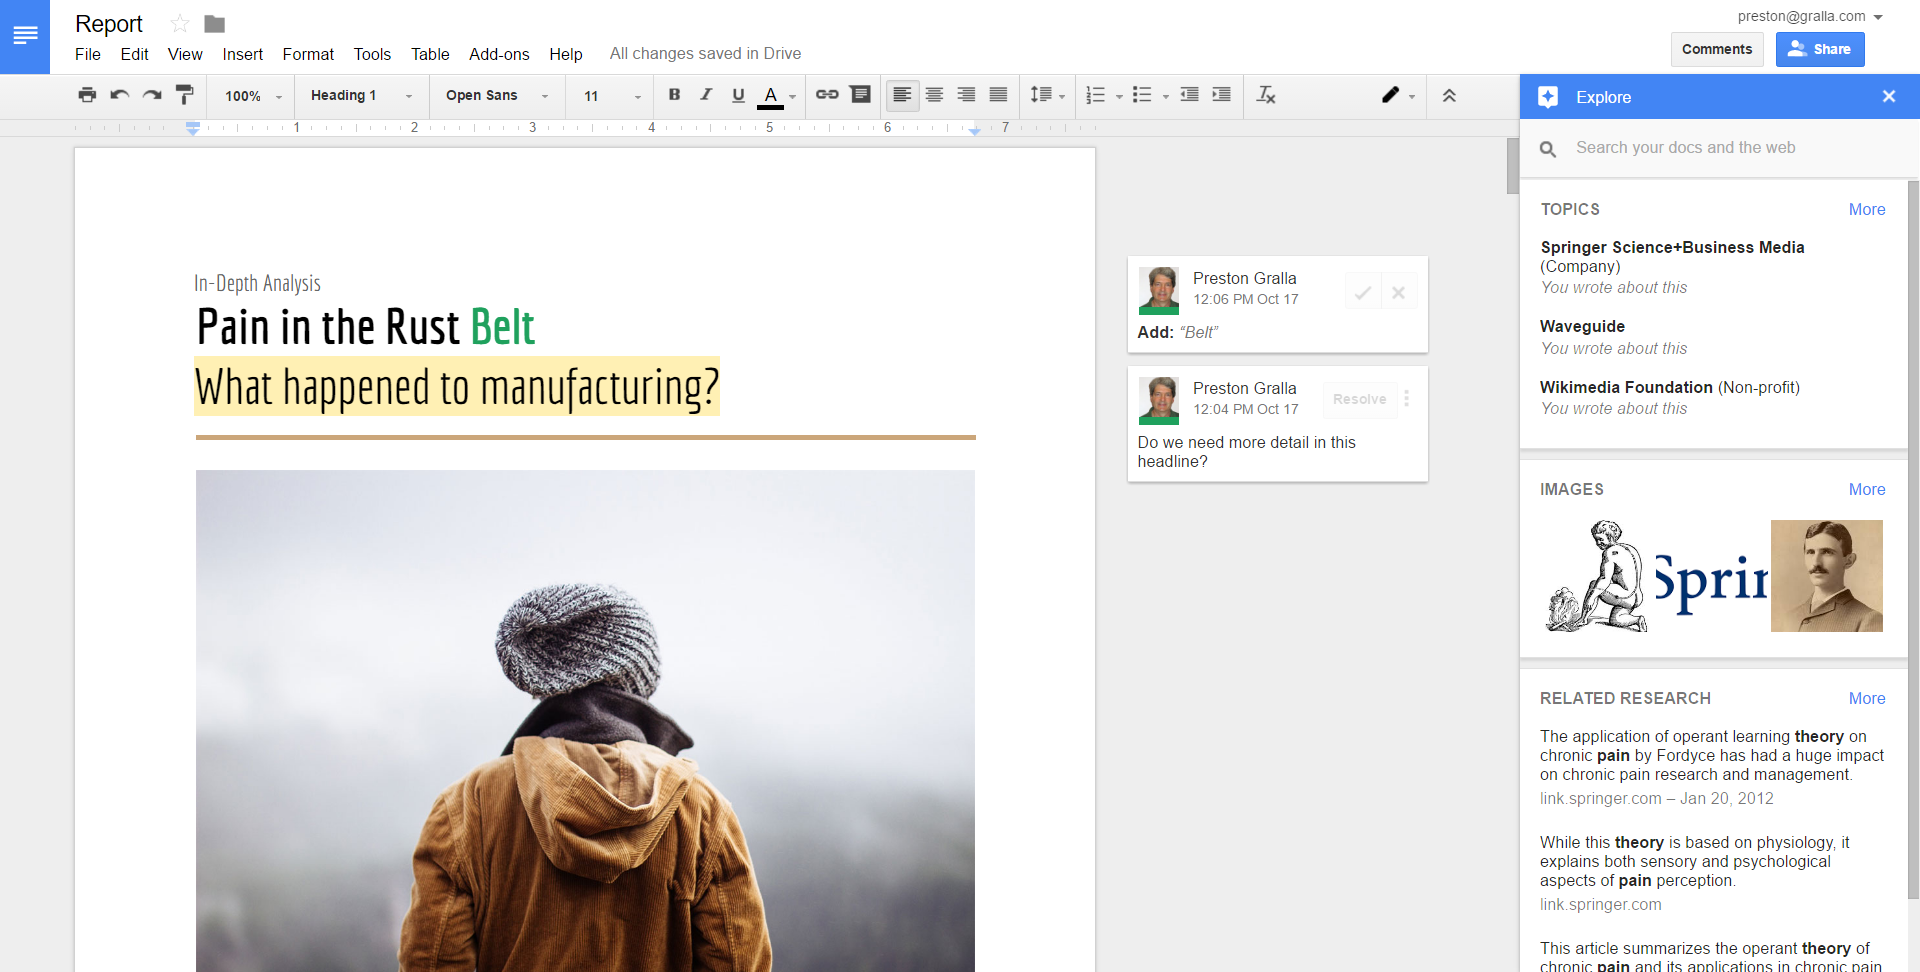
The biggest search engine on the planet lets you search for images and research from right within Google Docs, and does a very good job of it.
The Related Research section was much better. Three articles were included — two specifically about the Rust Belt, and one about Youngstown, Ohio, which is located in the Rust Belt.
So rather than relying on Google to guess what I was looking for, I decided to use the tool to do a search. When I searched on the phrase “steel plant,” the results came up on the right side of the screen under three separate tabs: Web, Images, and Drive. Each result showed the title of the page that was found, its URL, and a paragraph description.
For the most part, the web results were relevant. (The exception was a single outlier, the top search result, a site whose summary read, “Steelplant is about the colorful, bizarre and extreme. Street smart, weed infused and graffiti covered gifts. Take a puff and pass it around.”)
The Images tab was more on target — no weed; only photos of actual steel plants. I found far more images than I did when using Word — I scrolled through them and never came to the end.
To check out the copyright status of any photo, hover your mouse over it, then click the small search icon that appears. You’ll see a larger version of the photo, plus a general description of its copyright status, such as “Image is labeled for commercial use with modification.” To insert a photo, place your cursor where you want the photo to be placed, then click the photo. Underneath the photo will be the URL of the web site where the photo is from. You can leave it there, or delete it if you’d like.
As for the Drive tab, it does a search of your Google Drive for the search term.
Google Docs has one more useful research tool. Right-click any word in a document and you can either get a definition or do a search on the word.
Bottom line
Google Docs beats out Word here because it finds more online images, makes it easier to figure out the exact copyright of images, and lets you search the Web for anything, not just words within documents.
Live collaboration
My report writing was in full swing, but I needed to find out how well Word and Google Docs let me simultaneously work on the same document with others. Online collaboration allows several people to make edits, see what edits other people are making, and chat with them while the work goes on. For groups, it’s a great way to get work done together and done fast.
Microsoft Word
Microsoft Office, including Word, has always lagged behind Google Docs when it comes to live collaboration. It lags still. Making a live connection with someone else is an awkward (sometimes ugly) process.
Collaborating on a Word document can be a complicated process.
Let’s say you’re working on a Word document and want to collaborate on it with someone else. You click the Share button on the upper-right corner of the screen and a Share pane appears. You then type a name into the “Invite people” box and Word searches your Contacts list. If the person isn’t in your Contacts list, you can instead type an email address. You can add multiple people this way.
Underneath the name, choose whether you want the person to be able to edit the document, or just view it while you’re working on it. Type in a message (if you want to) and click Share.
Word will send an email to the people with whom you want to collaborate. They then have to click a confusingly named button underneath the file name, “View in OneDrive,” at which point, they’re sent to the online version of Word. But they can’t collaborate yet. First, they have to click “Edit Document” and, from the screen that appears, choose to edit either in the Word client or in the online version of Word. Only then will they be able to make changes and see the changes you’ve made.
That’s bad enough, but there’s another issue as well: You can collaborate live with people only if you’ve saved your document to OneDrive. If you try to collaborate on a document that’s not in OneDrive and you click Share, you get a message that you first have to save the document to an online location. By “online location,” Microsoft actually means OneDrive — if you save the document to Google Drive or any other online location, you’ll still get the same message.
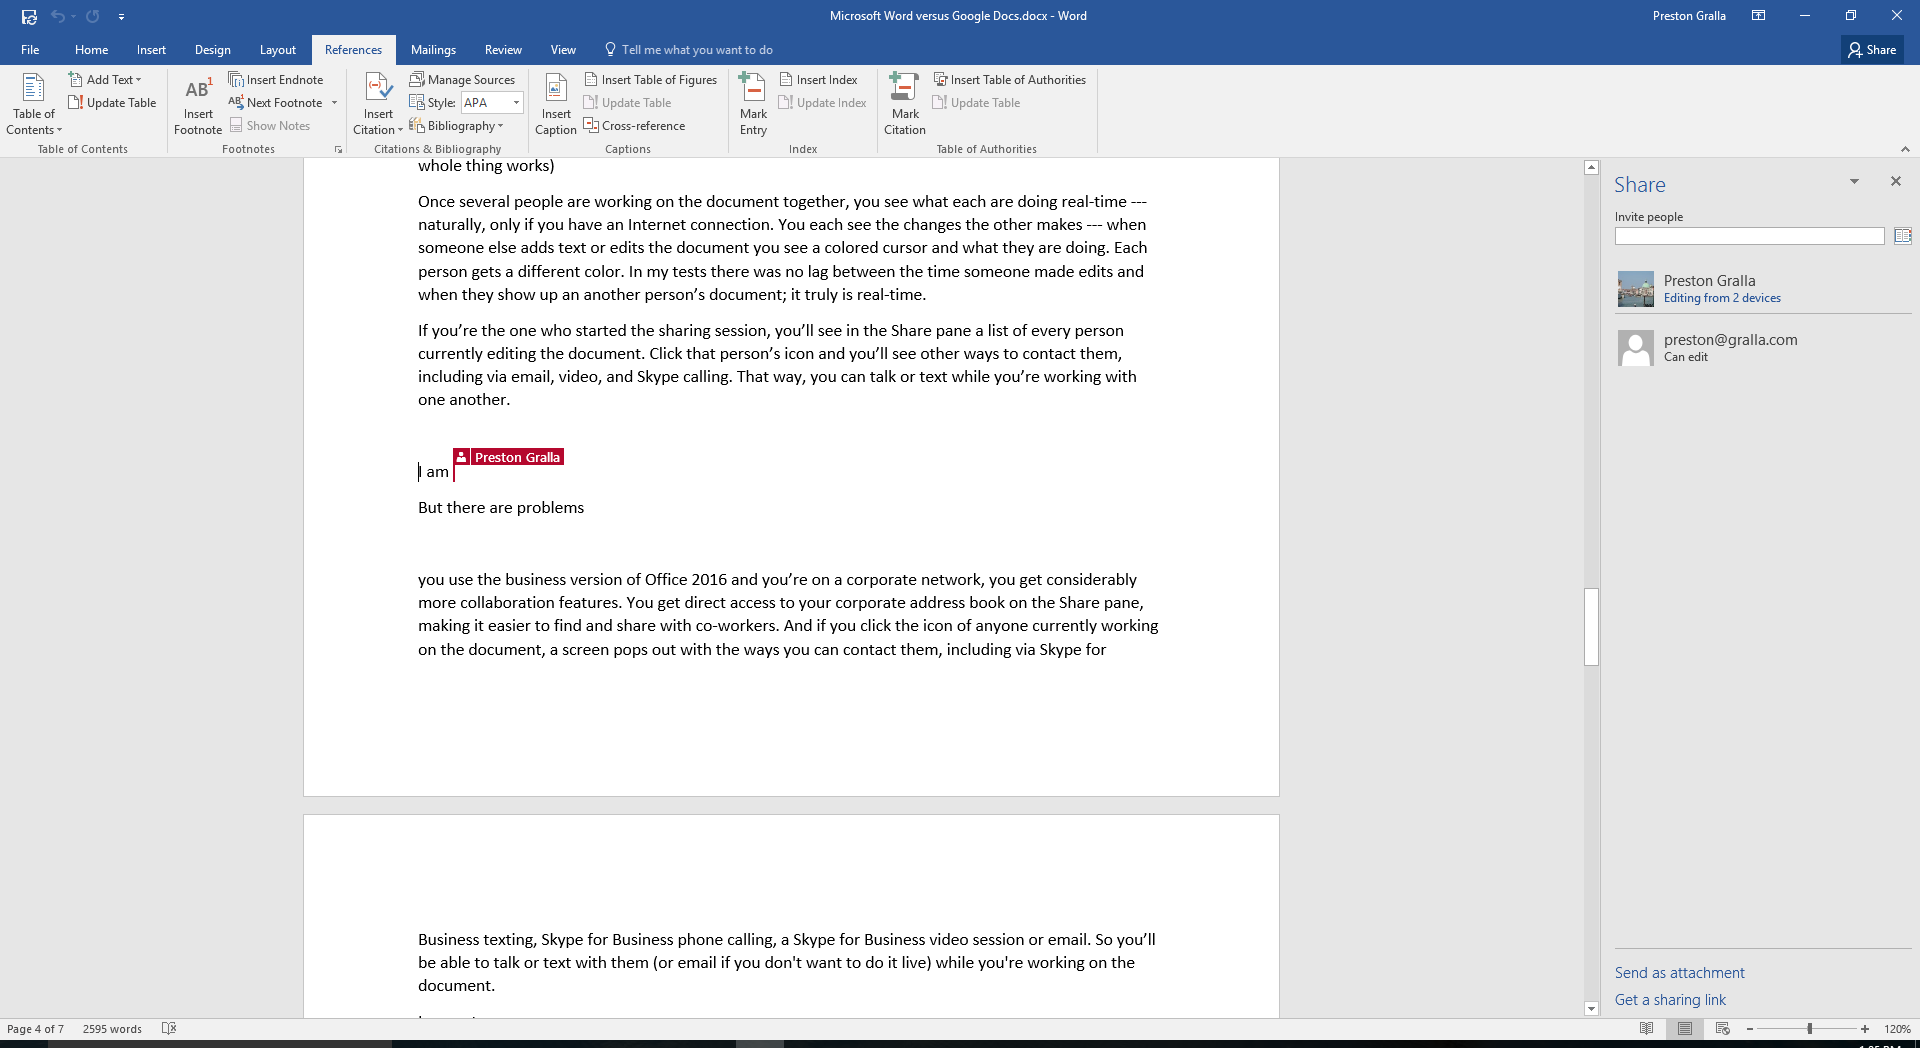
Once several people are working on the document together, you can see the changes the others make in real time — when one user adds text or edits the document, you’ll see a colored cursor indicating their presence (each person gets a different color). Hover your mouse over the cursor and you’ll see the name of the person. In my tests, there was no lag between the time someone made edits and when they show up in another person’s document; it truly is real-time.
If you’re the person who started the sharing session, you’ll see a list of every person currently editing the document in the Share pane. Click that person’s icon and you’ll see other ways to contact them, including via email, video, and Skype.
If you use Office 365 Business Premium or Office 365 Business and you’re on a corporate network, you get considerably more collaboration features. You get direct access to your corporate address book on the Share pane, making it easier to find co-workers and share with them. And if you click the icon of anyone currently working on the document, a screen pops out with the ways you can contact them, including via Skype for Business texting, phone calling, video or email.
(For more details about sharing with Word and other Office business applications on a corporate network, see Review: In Office 2016 for Windows, collaboration takes center stage.)
Google Docs
Google Docs really shines when it comes to live collaboration. Unlike Microsoft Word, there’s no kludginess in the live-sharing process, no jumping through hoops, no confusion on what to do or how to do it. It’s as natural as creating a document.
Google Docs really shines when it comes to live collaboration.
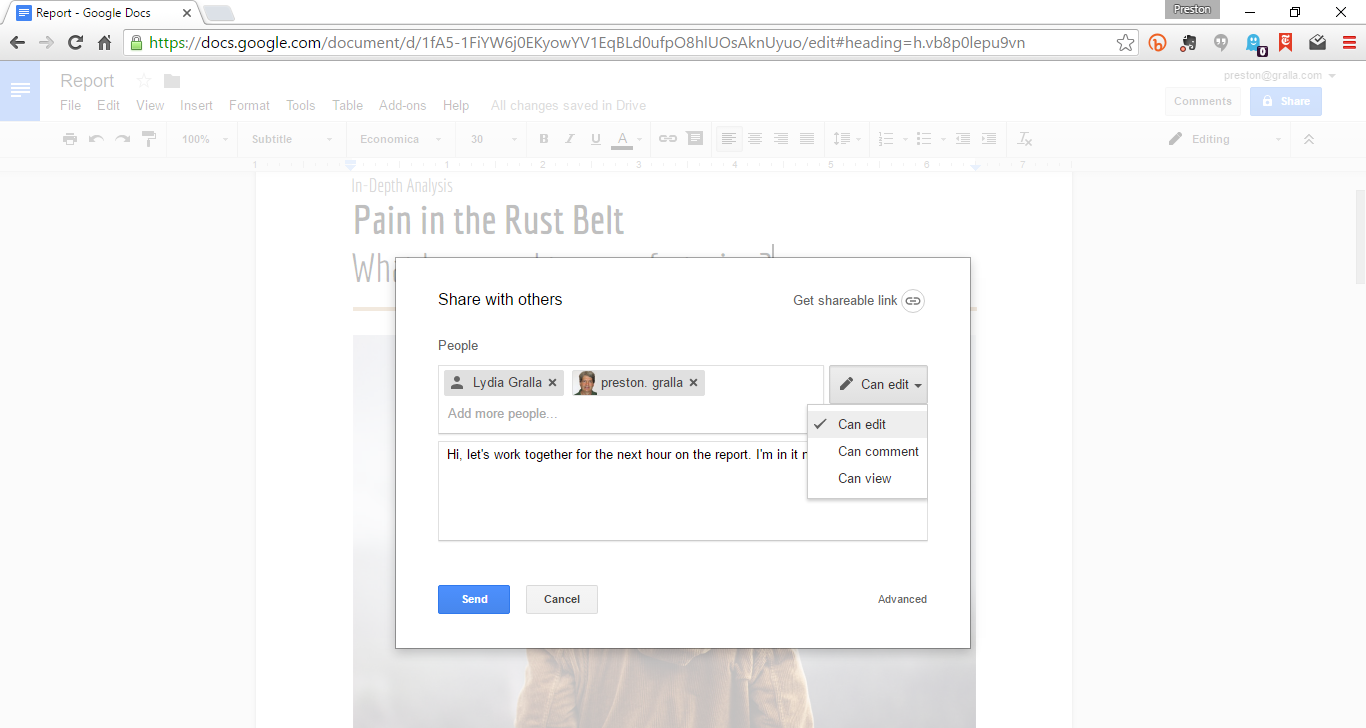
To collaborate live with others, click the Share button on the upper right of the screen, then type in the email addresses of the people with whom you want to share. As you type, Google Docs looks through your Gmail contacts list; however, you can type in the email address of anyone with whom you want to share, whether or not they’re in your contact list.
For each person, you can choose whether they can edit the document, only comment on it or only view it. Type in an optional message and an email gets sent to your collaborators.
Once your collaborators receive the email, they just need to click on Open in Docs to open the file. Everyone invited can work on the document simultaneously. As with Word, everyone is identified by a colored cursor, and you can watch what they are doing real-time. Hover your mouse over the cursor to see someone’s name.
Click the chat icon at the upper right of the screen and you can chat with everyone working on the document. I found that live chatting while simultaneously working on the document made collaboration far more effective — people can decide who will work on what sections of the document, for example, or discuss edits as they’re being made.
You can also manage people’s collaboration and editing rights after you’ve first set them. Click the Share button, then click Advanced, and you’ll see a list of everyone who has access to the document. You can change their access rights (from editing to only reading, for example), and handle global settings for access to the document. This happens by choosing whether anyone with editing rights can also add new collaborators, and whether commenters and viewers should be allowed to download, print, or copy the document.
Bottom line
Google Docs is far superior to Word for live collaboration. The collaboration features have been built directly into its interface, and don’t feel like afterthoughts, as with Word. With Google Docs, it’s simple to invite people to collaborate, set their collaboration rights, and chat with them while you do the work together.
Tracking changes in a document
Nothing is perfect the first time around — and most companies like to track the changes that are made using what are called review features. I tested the review functionality — markup, commenting, etc. — of Word and Google Docs.
Microsoft Word
Microsoft Word’s extensive review features have been considered the gold standard for years — and with good reason. To begin with, Review has its own tab on the Ribbon.
To put a document in mark-up mode, you select Review > Track Changes. At that point, every edit someone makes to the document will be visible, with deletions marked as strikethroughs, additions marked in colored text, and comments appearing in a pane on the right-hand side of the screen. Each edit carries the name of the person doing the editing. You can also opt to have the various edits labeled on the right side of the document instead of within the text, if you wish.

Microsoft Word’s extensive review features have been considered the gold standard for years — and with good reason.
When going over other people’s edits, you can choose to see all changes, some changes (for example, you can decide not to see formatting changes), or none at all. You can easily accept or reject individual changes by right-clicking on each change; there is also an icon in the Ribbon that lets you cycle through all the changes — or you can decide to simply accept or reject all at once. Even if you’ve never used markup before, you’ll find it easy to do.
One of the nicer features is that, by right-clicking on a comment, you can reply to that comment directly inside it (creating a thread of comments) or mark it as Done. The comment will still exist, so you can revisit it if you want, but it’ll be grayed out, so that you know it no longer requires attention.
I found Simple Markup mode particularly useful. When you turn on Simple Markup, you’ll see a vertical line in the margin where any revisions were made, but you won’t see the markup itself. That makes it easy to read a revised document — you know where edits have happened without having to see all the markups. To see the edits, click the line.
In sharing my document for editing, I found an underused feature especially helpful — the Protect group on the Review tab. It lets you control the kind of editing that other people can do to the document — for example, if there’s a section you don’t want touched at all, or certain markup features you want turned off.
Select an area of the document and select Block Authors, and no one except the document creator can make edits there until the feature is turned off. With the Restrict Editing feature, you can also make a document read-only, or only allow certain kinds of edits — for example, allow only comments but not edits, or edits but not comments, and so on.
If you’re on a corporate network, you’ll can also set this on a user-by-user basis — a very useful feature that Microsoft should make available to individual users, not just corporate ones.
Google Docs
Surprise: Google Docs’ editing and markup features are excellent and give Word’s a run for its money.
To use markup, you put the document into Suggesting mode by clicking the Editing button on the upper right of the screen and selecting Suggesting. At that point, edits are tracked — each user is assigned a color, and deletions (shown as strikethroughs), additions, and comments are all in that color.

Google Docs’ editing and markup features are excellent and give Word’s a run for its money.
You share a document for editing in the same way you share for collaboration — by clicking the Share button on the upper right of the screen, then typing in the email addresses of people with whom you want to share the document.
All this is to the good, but Google Docs lacks some of the fine-grained editing features offered by Word. For example, although you can give other users edit or read access, you can’t get more granular than that — for example, you can’t block parts of the document, as you can with Word.
Very useful, though, is a somewhat hidden feature that lets you revert to a previous version of a document. Select File > See revision history and a pane appears on the right side of the screen that shows each time you or others worked on the document. Click any instance on the list and you’ll see the edits made during that session, as well as the names of the people who edited it. If you prefer that version to your current version, click Restore this version, and you’ll revert to it. You can easily undo that reversion by going back to your revision history, and restoring from there.
Bottom line
Google Docs has done a lot to catch up with Word’s editing and markup features — but it hasn’t quite gotten there yet. Although the revision history capability is a useful one, Docs still lacks some of the fine-grain controls that Word offers. If you don’t need that amount of control over editing, though, the two are about equal.
Working on different platforms
We live in a multi-platform world, in which people frequently have several devices on which they work, including Windows PCs, Macs, tablets and smartphones. So I tested working on the report in Microsoft Word and Google Docs on multiple devices, including an iPad and Android tablet.
Microsoft Word
Once upon a time, Microsoft largely ignored the Mac version of Office, letting it languish while lavishing development time on the Windows version. There was also very little enthusiasm for developing Office for non-Windows mobile devices — probably in the hopes of giving a boost to Windows Phone and its Surface tablet.
Those days are gone. Microsoft has considerably beefed up Office for the Mac, and offers full versions of Office for iOS and Android tablets and phones.
The Mac version, Office 2016 for Mac, looks and works very much like the Windows version. It sports the same Ribbon-focused interface, with the same tabs (minus the File tab — those features are available via keyboard combinations or by clicking on a folder icon just above the Ribbon on the left-hand side of the screen).
(For a full review of Office 2016 for Mac, check out Review: Office 2016 for Mac offers a new interface and better features.)
Because of the similarities, I could move seamlessly between the Windows and Mac versions while working on the same report. Text and paragraph handling, inserting photos, changing layouts and styles, collaborating live, commenting and editing, and seeing others’ edits and comments worked identically. However, the menus and ribbon are slightly different, so you will have to get used to a slightly different interface on each.

I also tested the iPad and iPhone versions of Word. Both apps are exemplary — in particular, the iPad version. Its layout mimics the Windows and Mac versions, with six tabs across the top: Home, Insert, Draw, Layout, Review, and View. The features on the tabs mimic the equivalent ones on Windows PCs and Macs, although not all of the features are available. The Home tab, for example, has icons for text handling, including creating bullets and lists, and changing fonts and font attributes, but it lacks more advanced features such as paragraph styles.
The document, when viewed on a tablet, looks like it does on the Mac and Windows PC, keeping the same fonts, layouts, graphics, and so on. It also lets you see all the edits, comments, and markups; and you can collaborate on a document in the same way as you do on a Mac and Windows PC.
The iPhone version doesn’t have the same rich feature set as the iPad version, given the small screen size and small virtual keyboard on a phone, so you don’t get the depth of text-editing and other features. However, it does a very nice job of accommodating for the iPhone’s form factor. Icons across the top give you fast access to changing fonts and attributes, searching, saving, and searching. There’s also an icon for switching to a mobile view that fits your document on the screen. You can view markup and edits others have done, mark it up yourself, make changes, and so on. Collaboration also works.
Somewhat confusing is that the equivalent of tabs in other versions of Office are hidden. To get to them on the iPhone, you have to click the font-handling icon at the top of the screen, and then tap the upper leftmost item from the menu that appears at the bottom of the screen, labeled Home.
Although all mobile versions allow you to read and edit Office files, you don’t get access to all features such as tracking changes unless you get an Office 365 subscription.
Finally, I tested the Android tablet version of Word, which looks and works much like the iPad version, but with one additional feature — besides the Home, Insert, Draw, Layout, Review, and View tabs on the Ribbon, it has a File tab as well, similar to the File tab on the PC version. As with the PC version, you can open and create files from here. You can also see the version history of a file you’re working on (a feature which isn’t available in the PC version), print, share a file, and change Word settings. However, unlike the PC version, you can’t export the file to a different format or manage your Office account.
Aside from that, the Android tablet version is essentially the same as the iPad version. As with that version, you don’t get access to all features such as tracking changes unless you get an Office 365 subscription.
Google Docs
Google Docs is web-based, and so working with it on the Mac is no different than working with it on a Windows PC. However, there are Google Docs apps for Android and iOS tablets. I tested the iOS and Android versions of those apps by reading and working on the report.

The iOS version of Docs can be initially confusing.
The tablet and phone versions of the Google Docs app for iOS are identical, and both display the reports accurately, including graphics, layouts, and charts. The only difference is that for larger text such as on the front page of my report, some text on the phone version had to be displayed on three lines rather than two.
At first I found the iOS app confusing — even just for something as simple as adding text, which sometimes works and sometimes doesn’t, depending on where you are in the document. When you’re on the first page of a document, an Edit icon appears at the bottom right of the screen. Tap it and the keyboard appears, and you’re put into edit mode. You can then add text and make edits to the document. At the top of the screen you’ll find icons for common text-handling tasks, such as making text larger and smaller, making it boldface or italic, and so on.
But if you’re not on the first page of a document — and you haven’t started editing the document — there’s no Edit icon. However, you can double tap anywhere on the screen to put yourself in Edit mode.
To access the app’s features, you use a menu which you get to by tapping the three vertical buttons on the upper right of the screen. It gives you options such as find and replace, put the document in outline form, do a print preview, and share the document with others.
I was able to use the app to collaborate in real time the same way I could using the web version. But it has a serious shortcoming for working with others: You can’t track changes to a document, or see edits and comments other people have made, unless the file is in Word’s .DOCX format, In that case, you can tap the menu button and select “Track changes.” This is an odd decision on Google’s part, given that Word is Google Docs’ main competitor.
The Android tablet version is essentially identical to the iPad version. I found only very small differences. For example, the iPad version has a Print Preview feature, which the Android version lacks, and the Android version has spellchecking, which the iPad version doesn’t have.
Bottom line
Word’s design and features are mirrored most closely among all its platforms — the tablet and phone versions look much like the Windows and Mac client versions. With Google Docs, the web version has a different look and feel than the tablet and phone versions, so you need to get used to two different interfaces.
Working on the web
Microsoft Word is a client that lives on a Windows PC or a Mac, rather than a web-based application like Google Docs. But there’s also a free web version of Word, so that you can work with Word documents online without having to install the client. I tried it out to see if it can compete with Google as a no-cost web-based resource.
Microsoft Word
I found the web version of Word to be fine for editing in a pinch. It looks much like the Windows version, with a Ribbon on top that has File, Home, Insert, Page Layout, Review, and View tabs.
The web version of Word is fine for editing in a pinch, but doesn’t have all the features of the “real” version.
Unfortunately, it’s far inferior to the “real” Windows version and doesn’t have nearly the same depth of features. For example, the Page Layout tab has only the most rudimentary of tools for margins, orientation, size, indenting, and spacing; it also lacks text-wrapping features and other advanced capabilities. I didn’t need mail merge or reference tools such as footnotes, but if you do, you’re in trouble, because the Mailings and References tabs are missing from the web version.
It also lacks of markup capabilities — you can make and share comments, but you can’t create edit markups. You also can’t accept or reject markups that others have done.
Another drawback is that you can’t edit or create .RTF files in the online version of Word, although you can handle .DOCX, .DOC, .DOTX .DOCM, .DOTM, .DOT, .ODT, and .PDF files. And you can open only files that you’ve stored in OneDrive or Dropbox, which some people will find annoying.
Bottom line
The web-based version of Word doesn’t come close to having the full feature set of Google Docs. Its rudimentary formatting tools, lack of advanced features such as wrapping text, and lack of markup tools means that if you’re looking for a web-based word processor, Google Docs is the way to go.
Handling file formats
Word’s .DOC and .DOCX file formats remain the standard for word-processing files. But they’re not the standards to which everyone adheres.
In today’s world, it’s important to be able to handle the widest variety of formats possible. So I tested which file formats Microsoft Word and Google Docs can handle.
Microsoft Word
Besides its native formats, Word handles a variety of others as well. You can also save your document using .PDF, .RTF, .HTML,.HTML-related formats including XML, and the .ODT open-document format.
When you save a document to another format, you want to also retain its attributes — such as wrapping text around a photo. When I saved my report to .RTF, .PDF, and .ODT, Word worked without a hitch. Graphics, text wrapping, and charts all displayed exactly as they had in the original report.
Google Docs
Google handles a variety of formats nicely, including .DOCX, .RTF, and .PDF. It won’t save to .DOC, however. On the other hand, it offers some tricks that Word can’t match, such as saving a document in ePUB format, an open standard that allows documents to be read on phones, tablets, and e-readers.
Docs has one more nifty trick: You can publish a document as a web page. While Word lets you save files in ready-to-publish HTML formats, Docs goes beyond that and does the actual creation of the page on the web, and gives you a link to it that you can share with others.
Google Docs also does a good job when importing files from .DOC and .DOCX formats. I uploaded.DOC and .DOCX files to my Google Drive, and was able to edit them in Docs, with formatting and layout retained.
Bottom line
Both Microsoft Word and Google Docs do an excellent job of handling a variety of file formats. For publishing to the web and in ebook format, you’ll want to use Docs.
Conclusions
So which of these two well-known word processors is better for creating reports and similar documents? As always, it all depends what your needs are.
If you’re looking for the greatest selection of templates, the best design tools, the most variety when it comes to creating charts, and the best text-handling and layout capabilities, there’s no doubt about it: Word is the winner.
When it comes to working with others, however, Google Docs has the slight edge. Word’s markup and commenting features are slightly better, but when it comes to live, internet-based collaboration, Google Docs makes the process much simpler by a mile.
As for everything else, it’s a toss-up. Both word processors work well on multiple devices and both can handle a variety of file formats, although if you want to publish to the web or as an ebook, Docs is superior.